
Managing light sources
in underwater photography
Here are a few thoughts about lighting in UW photography, prepared from a course for beginning UW photographers in our local SCUBA diving club.
Why are my photos all blue?
A photo taken in shallow water without a flash still shows some warm color; the roll-over image shows that some WB correction (or post-processing) can help to boost the weaker colors.
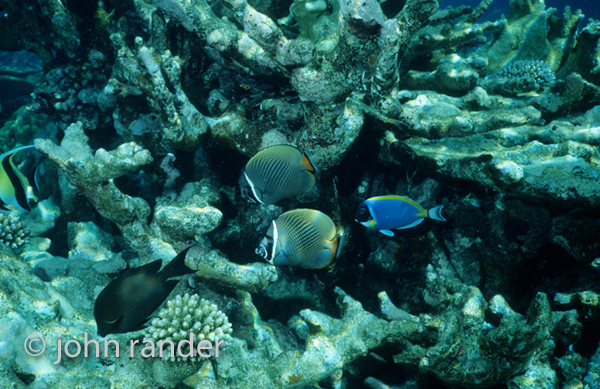
A light source near the subject is necessary if you want to capture all the colors waiting for you in the depths (see Understanding color loss UW). Adjusting the "White balance" on your digital camera will just not bring back colors that have been lost. A flash become an unavoidable accessory once you have left the shallows behind. As an example: if your camera and flash are placed 2 meters (6 1/2 feet) away from the subject, the intensity of red seen by the camera will be only 1/3 of its initial value (4 meter light path round trip).
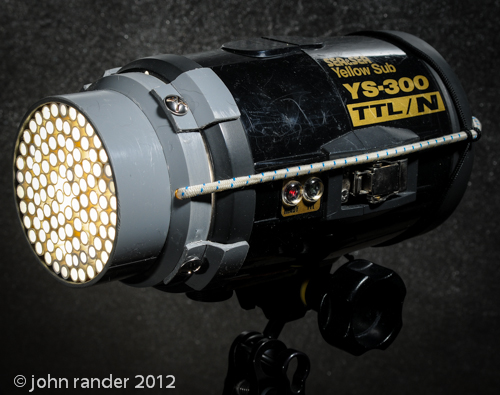
What flash power is needed?
Digital cameras are typically much more sensitive than the high resolution color-slide film used previously in photography. UW flashes today can therefore be less powerful and lighter. Flash power is usually given by its guide number (GN) measured in air for a sensitivity of 100 ISO. The higher the number, the more powerful is the flash. Doubling the GN quadruples the flash power. The value can be expressed either in meters or feet. Typical air values for UW flashes on the market range from GN-17 to GN-24 (meters), and these will cover most needs. Verify that the flash is compatible with your digital camera and housing; verify also the flash's angular coverage as this is important when using an ultra wide-angle lens. Smaller flashes with guide numbers as low as GN-9 are available, but have limited use beyond close-up photography. Photographers wishing to add a second flash to their system should seriously consider the risk that the second flash could replace the primary if that fails while traveling.
Why should you buy a flash with a larger GN?
Because underwater the effective guide number is significantly attenuated, typically half the air value, but can even be worse if visibility is poor. Practically speaking, this means that you camera will only see at best about 1/4 of the flash's intensity. Furthermore, do not forget that as you move away from your subject, the intensity will drop by 4 each time you double the distance.
Practical suggestion : Once you have acquired a flash, it is wise to familiarize yourself with it in ( e.g. swimming pool) before taking it on a diving trip. If you are new to UW photography, start by making a simple table of flash settings required for good photos with your camera versus the subject's distance UW (I would recommend noting the "apparent distance" for this since you won't have a way to measure the distance while diving). This exercise takes about 30 minutes for pairs of divers in a club pool session.
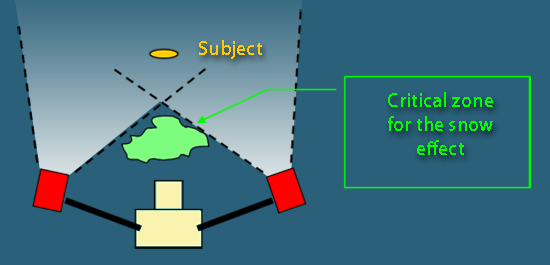
Why is there snow in my UW photos?
The digital camera's built-in flash working in a transparent UW housing is really not adapted to UW photography. Why? Because it illuminates all particles in suspension in the water in front of the lens. Similarly, if you use an external flash, but position it too near the housing's lens port, you will also find snow in your images. On dives where there are a lot of particles in suspension (e.g. during a plankton bloom) we generally use longer flash arms (except if there is a strong current). Another trick sometimes used in close-up photography while "muck diving" is to mount a "snoot" or cone on the flash to produce a narrow beam which illuminates only the subject and does not spread out to the zone in front of the lens port (however, this makes it more difficult to aim the flash on the subject).
Correct positionning of the external flash(s) can often avoid illuminating the critical zone in front of the lens port
Here's a DIY honeycomb snoot mounted on an UW flash.
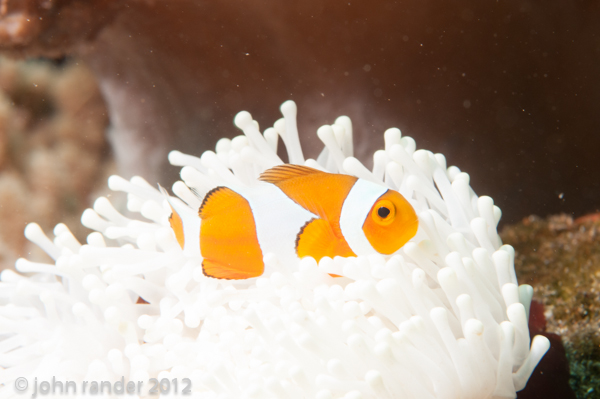
Why are my photos under/over exposed with the flash?
Many beginner's flash photos look like this (deliberately) overexposed clownfish; the roll-over shows the final image after post-processing. It reveals the enormous advantage of taking images in RAW format.
The exposure metering in "automatic" mode with a flash is often unreliable underwater (generally it's the coral behind our interesting little fish that is read), and so that is why many UW photographers work with their flash(es) in "manual" mode, adjusting the lighting intensity themselves. The habit of pre-setting the flash intensity as one moves in to shoot a subject is rather quickly acquired with some experience. You should also understand that shooting in RAW format (rather than JPEG) gains you much more latitude to correct exposure errors later (post-processing), without sacrificing color quality.
Why does my external flash give such harsh shadows?
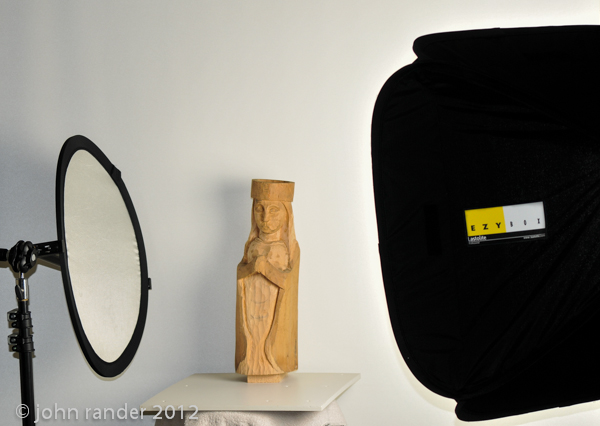
Very soft shadows are obtained in the studio by using a main flash equipped with a diffuser which is large with respect to its distance from the subject, and often this is completed with a second fill source (the reflector in this example). The diver-photographer seeking soft lighting and saturated color tries to approach this ideal case in close-up situations.
The harshness of shadows depend upon the relative size of the "main" light source with respect to its distance from the subject. In Studio photography, one uses very large diffusers to soften shadows on a model; in UW photography, you can produce the same effect while taking close-ups by moving your flash in as close as possible to small subjects. Moving back to shoot larger subjects, you will need a second light source to fill-in the shadows created by the main flash. This second source could be simply the ambiant sunlight (but keep in mind that it will be quite bluish compared to the main flash) or you could use a second flash (but, as in Studio work, you must lower its intensity with respect to the main source in order not to produce ugly double shadows).
Note: the "diffusers" sold with most UW flashes should be viewed as intensity reducers; they do not increase the source size enough to significantly soften shadows (except perhaps for extreme close-ups). They do increase slightly the flash's angular coverage.
Why do my subjects look flat, without texture?
This photo demonstrates how using lateral lighting can reveal hidden shapes and textures. Frontal lighting would have removed most signs of this flat-fish.
This is a matter of how the "main" flash is oriented. Frontal lighting, with the flash near the lens port, can not bring out shadows which the camera could see. On the other hand, the more you aim the flash laterally (sideways or overhead), the more you will reveal the subject's texture and shape. Don't forget that shadows too bring precious information!
Should the flash stay mounted on the housing?
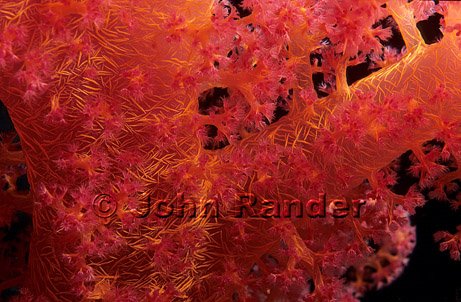
This image was taken with the main flash moved around behind and slightly above the soft coral.
Absolutely NOT! In macro (or "proxi") close-up photography it is often useful to unmount the main flash and hold it in your hand to find the best lighting position. In other situations, a second flash, operating in "SLAVE" mode, can be held by your diving buddy to obtain a more interesting lighting variation. In the same spirit, BE CREATIVE! Think seriously about adapting the position of your flash(es) to each new situation, thus avoiding a boring repetition of the same lighting scheme. Those adjustable flash arms were designed for that!
The importance of correctly managing the position and orientation of the flash (or flashes) should be obvious: that is why having a LED pilot lamp on each flash is essential.
Top of the page

© John Rander, all rights reserved.